


Printable Cornhole Board Building
Plans and Instructions
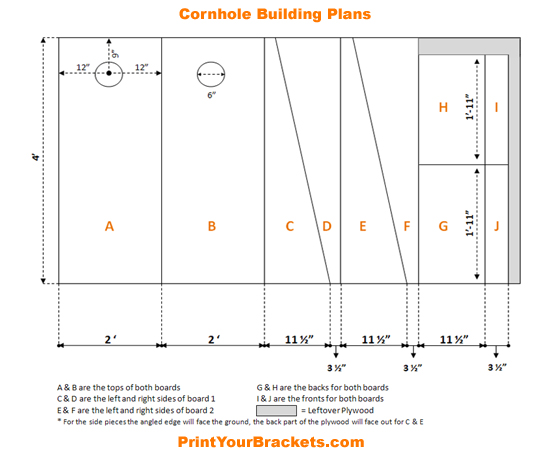
Fully Enclosed Boards with Only 1 Sheet of Plywood
Click Here for a Printable Version of the Plans Above
Click Here for a Printable Version of the Instructions Below
| Cornhole Board Instructions |
|---|
|
Materials Needed
Measure and cut the first two sections “A” & “B” 4’ x 2’, these will be the tops of each cornhole board. Be sure to cut each piece first before measuring for the next piece, you lose about an 1/8” from the cut of the blade. Measure and cut section “C”, this piece will be 3 ½” on one end and 11 ½” on the other. Do the same for “D”, “E”, and “F”. These will be the four sides of the cornhole boards. Measure and cut sections “G” and “H” 11 ½” x 1’ 11”, these will be used as the backs of the cornhole boards. Measure and cut sections “I” and “J” 3 ½” x 1’ 11”, these will be used as the fronts of the cornhole boards. Cut a section of your 1” x 1” wood 47”, you can also cut 2 or more smaller pieces the appearance of these is not important, they are just used to screw the plywood into and strengthen the boards. Take one side board and one top board, align them and screw them into the 1” x 1”, do not screw into the other piece of plywood as it will cause splitting. The top board sits on top of the side board, and the angled edge of the side board will be facing the ground. Complete this step again for the other side of the board. One side of the cornhole board uses the front of the plywood the other uses the back. You should also put a 1” x 1” across the middle for support. It is time to attach the back piece. Measure and cut another piece of 1” x 1” to fit between the two 1” x 1” pieces attached to the sides. The back piece goes in between the two side pieces and under the top piece(not on the outside). Attach the front piece using the same process as step 6. Your first board should be completely assembled, complete steps 5-7 for the second board. Now it is time to cut out the holes. The easiest way is to use a hole saw, but not everyone has one of these readily available, most people use a rotozip or jigsaw. From the top center of the board measure down 9”, from the side measure in 12”, where these two intersect is the center of the hole. From the center of the hole measure out 3” and set the drafting compass to that distance and draw your circle. Drill a hole on the inside edge of the circle, big enough to get your jigsaw blade into, then cut the hole. Fill the screw holes in with wood filler and sand off when dry. You should also lightly sand the top of the board, if needed. It is best to put on a coat of primer before putting the Latex Semi Gloss Paint on, but the primer and paint are both optional. *Note: These plans are for the fully enclosed boards, not the boards with the legs. Click Here to Print Instructions |